In the age of the smartphone and digital camera, we take so many photos. They’re in folders on our laptops and hard drives, they’re taking up precious storage space on our iPhones. But most of the time when I see what people capture, either at home or traveling, I think to myself ‘when are you ever going to look at that again?’.
A former boss once told me about her solo trip around Europe after she graduated University. Eight countries, six weeks, and two rolls of film. She reflected on taking the time at each site to line up the perfect photo, as she only got one shot. That’s one photo of the Eiffel Tower, one photo of the Coliseum, and one photo of Big Ben. And without being able to instantly see what she’d taken, “I just had to have faith that they would turn out okay”, she recalls.
This is in stark contrast to my own post-university Euro trip. I set out in 2008 with my blue point & shoot Canon PowerShot and, from the amount of photos I amassed, must’ve had my finger on the trigger the entire time. I took dozens of photos of every monument we came across and even spent an hour taking photos of pigeons in a Paris square (I’m still too embarrassed to look at those photos).
Upon returning home, I promptly uploaded them to my computer and set out to select the best ones to print and share on Facebook. After an hour of just scratching the surface, I fatigued, left my computer and never returned to the task at hand. Over the years, I’ve reopened the folder of photos from time to time but have never gotten much further.
And while it’s such a convenience with digital to be able to immediately see what you’ve captured, part of me yearned for what my former boss had had. #TravelPhotographyGoals. Yes, you had to line up the perfect shot, take time to find the right angle, and wait for the best light, and it could look like complete shit a month later once developed.
Though I still take a dizzying number of photos (a thousand per week of travel), I’ve amassed a few strategies to keep it all manageable, and to ensure that my travel photos don’t again wind up in an abyss. Also included are suggestions on what to do with your travel photos so you don’t just forget about them.
Managing Your Travel Photos
One & done philosophy
We all have a tendency to take several photos of the same thing, thinking we’ll get a better shot on the second, third, or tenth try. When I scroll through my iPhone photos, I’m often amazed how I consistently take two or three photos of a single thing and (unsurprisingly) I’m always out of storage. But what I’ve noticed is that most of the time, my first photo is the best so I’ve implemented a one & done strategy. Unless you’ve clearly taken a dud (finger over the lens or a bald head in the corner) feel confident with your first shot and move on.
Delete as you go
On that note, sometimes I can’t help but take a lot of the same photos even with my rule. Other times, I just take god-awful photos. A key to keeping your travel photos on track is to purge duplicates or subpar photos as you go. Once you’re done exploring for the day or just taking a break for a bite to eat, go back through the photos you’ve taken and select the best versions of similar shots. Delete any duplicates and trash any crappy shots. Doing this in the moment will save your sanity later when you’re painstakingly going through one by one to pick the best. It’ll also help you to see what you might need to reshoot if your photos didn’t turn out as you wanted – better to find out while you’re still there then when back at home.
Back ’em up
I always find full memory cards in my camera bag and around my house, and I never know if I’ve already uploaded them. Be regimented about this and upload your travel photos on a consistent basis during your trip and immediately once you’re home. When you’re done, reformat your memory card. I’ve undoubtedly lost many great photos because I’ve needed to reformat a memory card in a hurry to have space on my camera and convinced myself that all the photos had already been transferred to my laptop. I’ve also gotten into the habit of backing up my iPhone photos monthly to ensure they’re protected in case I lose or break my phone (which happens more than I’d like to admit).
Develop an online filing system
I used to have no system for organizing photos and inevitably wound up with folders titled DCIM-23k4j3. I also would have several copies of the same folder as I’d have uploaded them twice. And if I was looking for a particular photo, I was never able to find it anywhere. So frustrating! Now I have a basic taxonomy for my photos, which are saved in the same format on Google Drive and my external hard-drive (this is the one I currently use & love). I have a master folder called Photos, then folders with the year (ie. 2015, 2016, 2017, 2018 and so on), and then I create folders by destination or activity under each year (ie. Italy, Toronto, Skydiving, etc).
One of my keys to success is that I take the time to divide my travel folders into separate categories. It’s great that you uploaded the folders from your memory card and retitled them based on where the photos were taken. But I always find random photos from another time at the bottom of the folder that I didn’t realize were there, and of course they’re always the ones I’ve been desperately searching for. Another critical step is to get them into the filing format as soon as I upload them. I often want to procrastinate it until a later date, but I never get around to it.
It’ll take some time to build this system – and I’m not going to lie, going back through all of your photo folders is tedious. But I promise it’ll be worthwhile in the end (and you’ll probably come across some gems you completely forgot about!).
What to do With Your Travel Photos
Upload to a photo sharing site
Online photo storing or sharing platforms such as Flickr, Shutterfly, Google Photo or SmugMug can be helpful in creating albums of your favourite images. These can be easily shared with family and friends so you don’t have to send everyone separate images (which is a nightmare when traveling somewhere with crappy internet), but also serves as a highlight of your trip that you can go back to whenever you want.
I find this helpful as it forces me to take some time after uploading my photos to curate the best images from the group. This is useful when I’m writing an article for that destination as well, as I don’t have to wade through hundreds of images.
Select some to print
I’ve recently gotten into the habit of printing photos. It reminds me of the days when I was younger when we’d take disposable cameras everywhere, and as a result I have thousands of photos from when I was growing up. And you know what? Looking through them is the best! I often choose my favourite photos that I’ve preselected and have them printed by an online source like Snapfishor Mixbook. Both are great for basic photo prints but also offer other backdrops for your images like canvas and metal.
As long as I’ve had a digital camera, I’ve had aspirations to print and frame my favourite photos but never got around to it. I found it so overwhelming to go through all of my photos and select the handful worthy of printing. I used to have dozens of empty frames gathering dust for years. Now I just automatically print my favourites and decide which go in the frame, changing them up from time to time. I put the rest of the prints in albums (Studio Calico makes excellent ones – they’re the only I’ve found online that I actually like) and look through them from time to time. I love the physicality of them and the tangible legacy they have as opposed to my digital files – it’s easily my biggest recommendation on what to do with your travel photos.
Use your creativity
I’m the least artistic person on the planet. I’ve always admired people who can use transform their travel photos into something spectacular. I’ve gotten lost for hours on A Beautiful Mess ogling their creations. There’s a fine line between kitschy and cool when it comes to scrapbooking, but these gals have it down, and the site offers a lot of inspiration on what to do with your travel photos.
And if you’re entirely uncreative like me, you can always outsource the creativity to sites like Mixbook and Snapfish, which create beautiful photos books, cards, calendars, magnets, coffee mugs, pillows and many other items using your personal images. There are so many interesting things to create with either of those sites that will keep your travels front and centre.
Put them on your TV
I love seeing my travel photos on my Apple TV screensaver. There’s not a lot that gives me more pleasure in all honestly. Friends also enjoy glancing at our travel photos when they visit and I get transported back to my favourite destinations. Here’s a handy guide on how to feature your photos on your Apple TV.
Those are my top tips for managing your images and what to do with your travel photos. Have any creative ideas of your own?
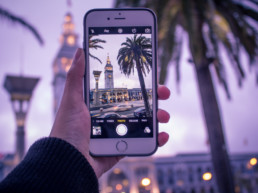
What to do with your travel photos header image courtesy of Dayne Topkin
Some of these links are affiliate or referral links though we only advocate for businesses and brands that we know and trust. Affiliate income helps us limit the number of ads on the site while allowing us to continue bringing our readers high quality travel content.
Make your next trip the best one.
Departful is a full service travel agency creating truly exceptional travel experiences that are 100% personalized to you. Wherever you’re going, whatever your interests, we help you plan the perfect trip.
Lauren
Lauren Barth co-founded Departful in 2012 and is the Managing Director of Departful Media. Since then she has worked between North America and Europe and has published content in partnership with a variety of tourism boards and businesses based around the world. Lauren is currently based in Toronto, Canada.